How to Fix a Nail Drill Machine at Home: 4 Common Problems
Is your electric nail drill making strange noises, refusing to spin, or stopping unexpectedly? Don't rush to replace it. Some nail drill problems can be diagnosed and repaired at home with the right steps. This guide explains four common problems with an e-file nail drill and how to troubleshoot them.
Whether you use a professional nail drill in a salon or an electric nail drill at home, understanding the possible cause of a fault can save time and help you decide whether the handle, connecting cable, motor, or main control unit needs attention.
4 Common Nail Drill Machine Problems
- 1. The nail drill becomes noisy after long-term use.
- 2. The nail drill handpiece will not rotate.
- 3. The nail drill starts and stops repeatedly.
- 4. The nail drill handpiece or main unit appears to be faulty.
Before replacing any parts, identify the symptoms and check the machine's voltage and connector specifications. The following steps can help you narrow down the problem.
1. Your Nail Drill Is Noisy After Long-Term Use
If your professional nail drill has gradually become noisier, dust and debris inside the handpiece may be contributing to the problem. However, worn bearings, a damaged motor, or a bent spindle can also cause unusual noise or vibration.
What you can do
- Switch off and disconnect the nail drill from its power source.
- Remove the nail drill bit according to the manufacturer's instructions.
- Open the handpiece carefully, following the correct disassembly procedure.
- Inspect the inside and remove loose dust using an appropriate dry cleaning method.
- Check for visible damage, unusual wear, or loose components.
- Reassemble the handpiece carefully, ensuring that all parts are correctly aligned.
Watch the disassembly and reassembly video below. Follow the steps carefully rather than forcing the handpiece open.
Video guide: Nail drill handpiece disassembly and reassembly.
Watch the original nail drill repair video on YouTube
Important: Do not add oil to the bearings or use rust remover unless the manufacturer specifically instructs you to do so. These products can attract dust, contaminate internal parts, or damage components. If the noise continues after cleaning, the handpiece may need professional inspection.
2. Your Nail Drill Handpiece Will Not Rotate
If the display on your nail drill machine works but the handpiece does not rotate, the problem may be in the handpiece motor, the connecting cable, or the control system. A working display alone does not prove that the motor or main unit is functioning correctly.
Step 1: Check the main unit
- Switch off the machine and disconnect the power supply.
- Disconnect the handpiece cable and motor assembly only if the design allows safe disconnection.
- Reconnect power to the main unit only after all exposed electrical connections have been safely isolated and secured.
- Check whether the display and controls behave normally, following the manufacturer's testing procedure.
If the display operates normally, the fault may be in the handpiece, motor, or cable. Further diagnosis is needed before deciding which component to replace.
Step 2: Inspect the motor
If inspection confirms that the motor is damaged, the motor may need to be replaced with a compatible part. Do not replace it based on symptoms alone.
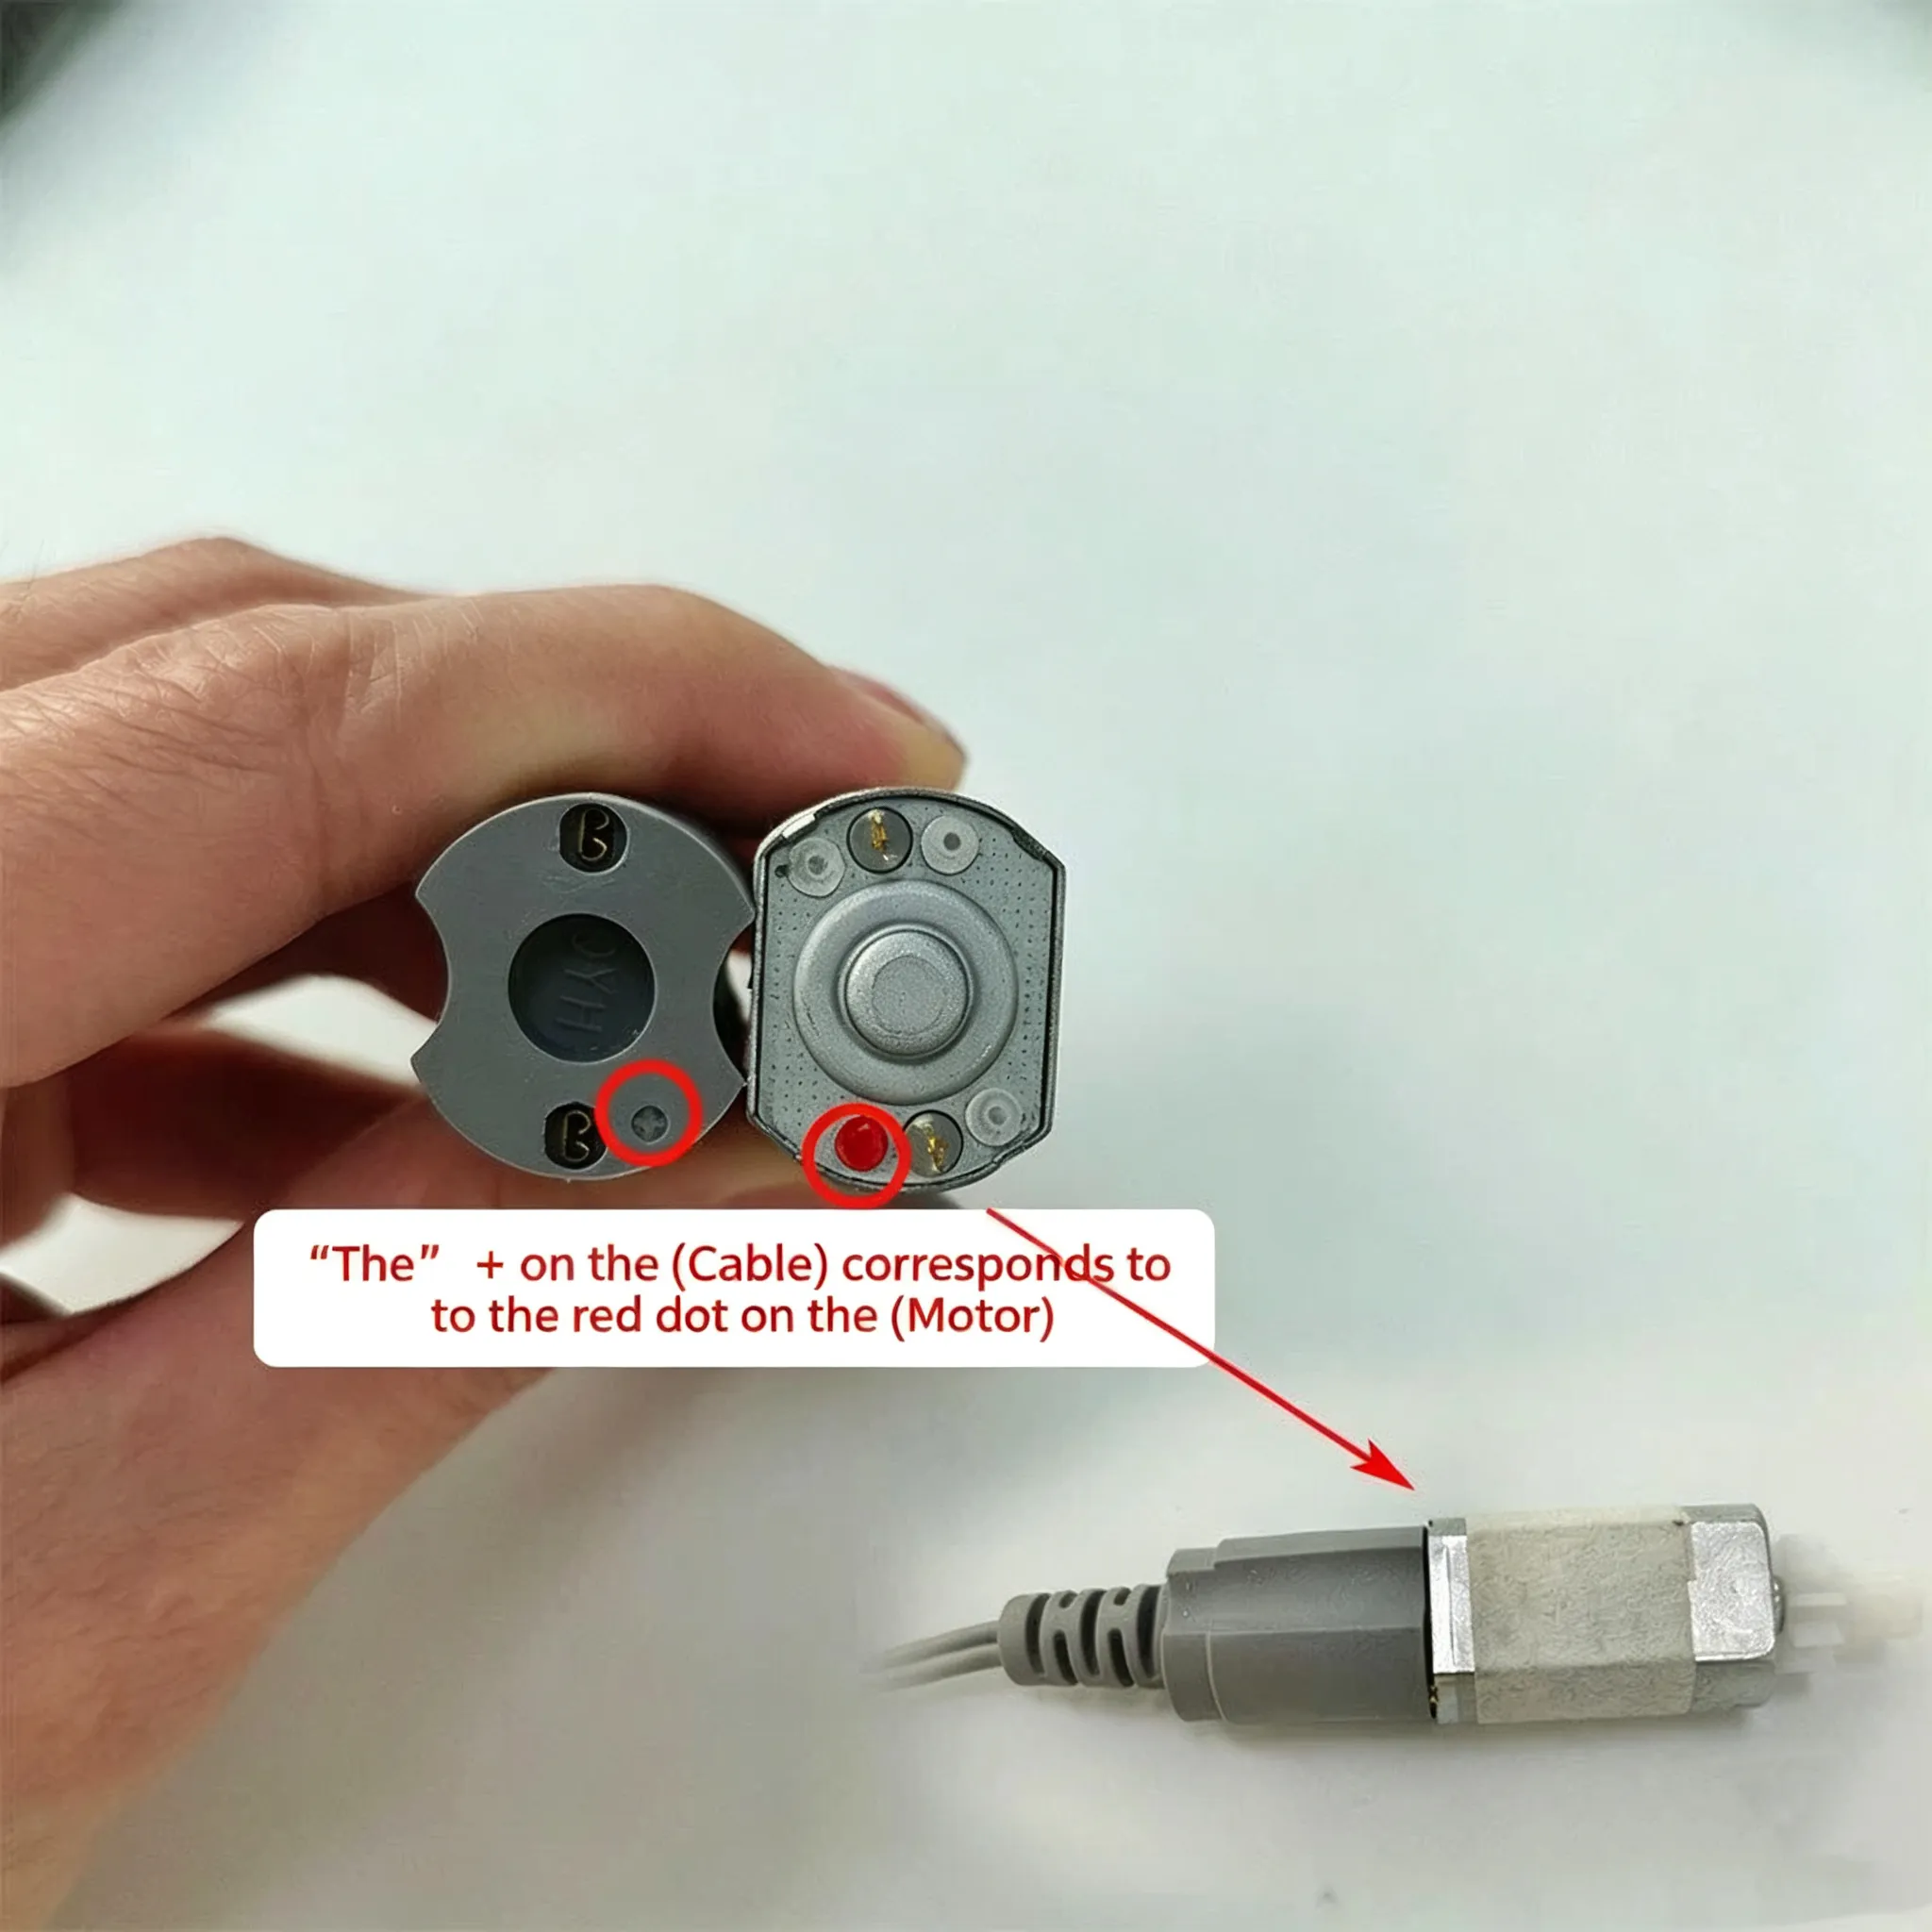
Reference image: Replacing the motor of a nail drill.
- Disconnect all power and open the handpiece using the correct procedure.
- Inspect the motor, cable connection, and internal components.
- Have the damaged motor replaced with a compatible model if necessary.
- Ensure that the internal connections and mechanical parts are correctly fitted.
- Close the handpiece before reconnecting it to the machine.
- Test the machine according to the manufacturer's instructions.
If you cannot identify the motor specification or wiring connections, contact your supplier before replacing the motor. Incorrect connections can damage the motor or main control board.
3. Your Nail Drill Starts and Stops Repeatedly
If your e-file nail drill starts rotating and then stops, or works intermittently, a damaged connecting cable or loose connection may be responsible. Other possibilities include motor wear, an overloaded handpiece, or a fault in the control unit.
Step 1: Check the handpiece cable
With the machine switched off and unplugged, inspect the cable, plug, socket, and visible strain-relief areas for damage. Check whether the connector matches the machine's socket. Never test a suspected damaged cable by repeatedly bending it while the machine is running.
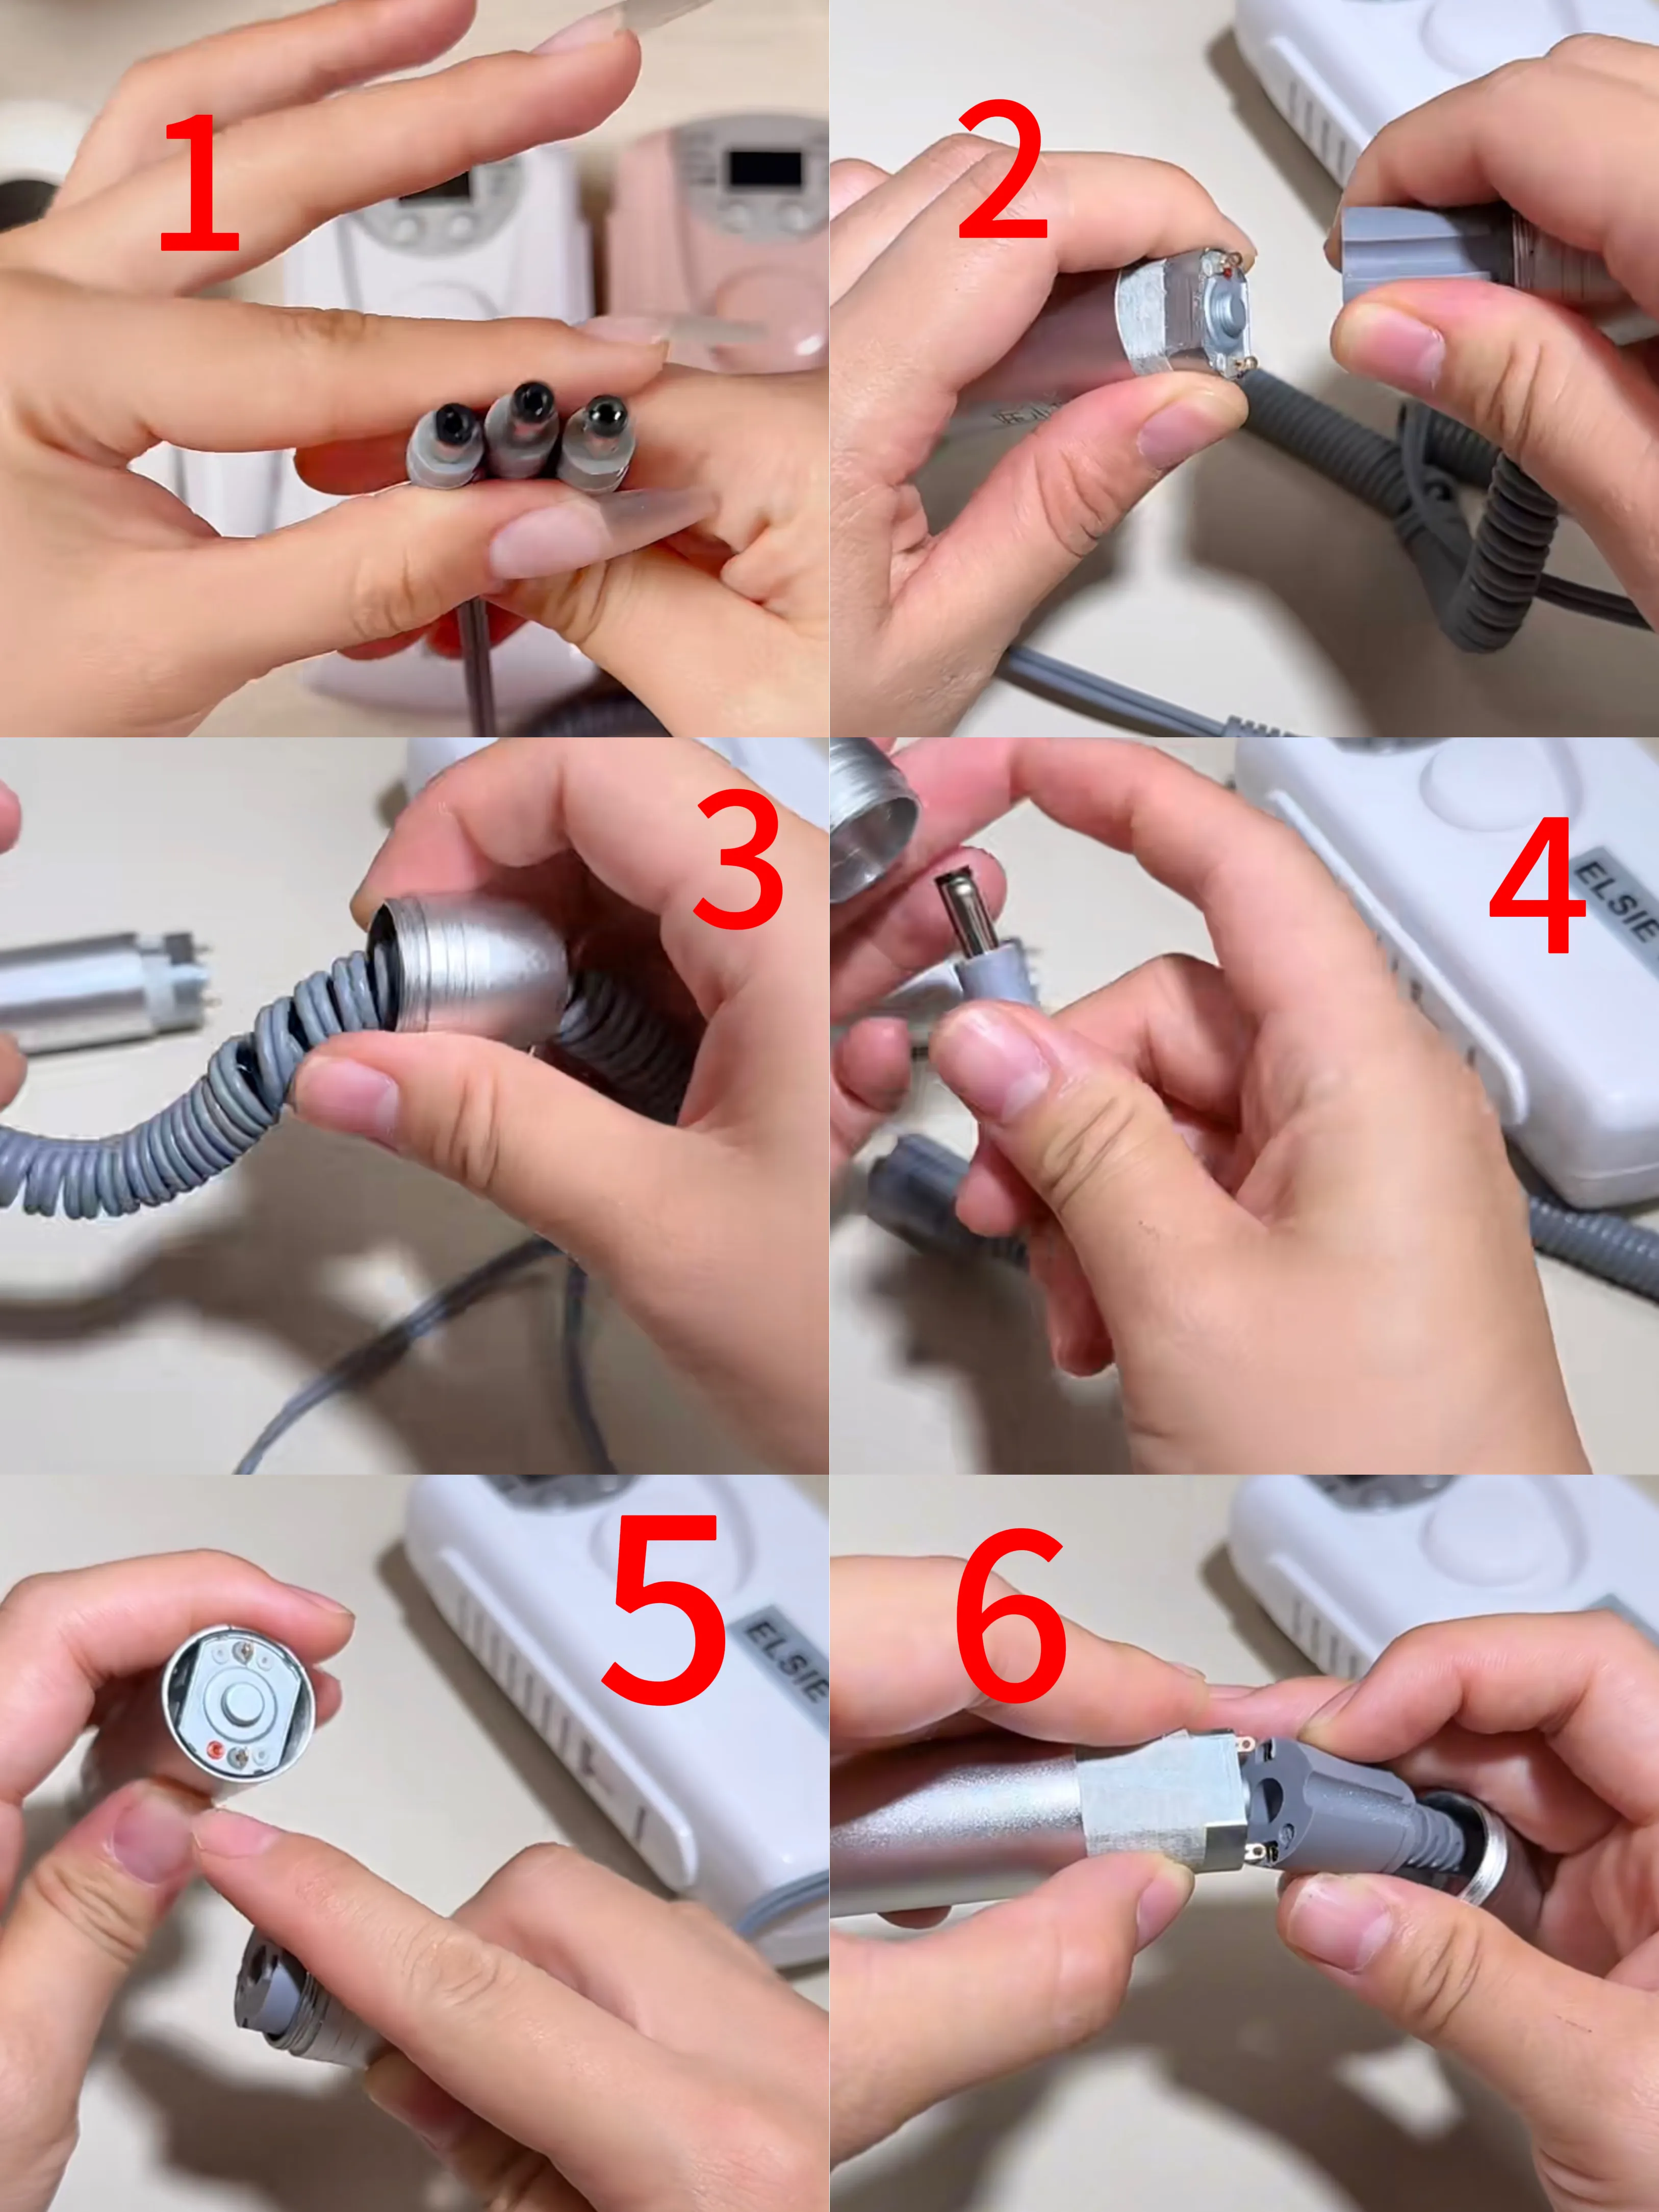
Reference image: Replacing the power cable for a nail drill.
Step 2: Replace the cable if a fault is confirmed
- Check the connector. Confirm that the replacement cable's plug matches the machine's socket, including its dimensions, pin arrangement, and electrical specifications.
- Open the handpiece tail cover. Switch off and unplug the machine first. Open the rear cover carefully using the appropriate tool.
- Disconnect the old cable. Separate the motor and cable connections according to the manufacturer's wiring diagram.
- Remove the damaged cable. Note the original routing and connector positions before removal.
- Install the replacement cable. Follow the wiring diagram and verify the polarity before reconnecting anything.
- Check the positive connection. In the illustrated cable assembly, the red marking indicates the positive terminal. Match it to the positive (+) connection only if this is confirmed by the manufacturer's diagram.
- Align the motor connector correctly. Ensure the connector pins or terminals are properly aligned. Never force a misaligned connector into place, as this may bend the pins or damage the connection.
- Close the handpiece. Check that the cable is not trapped and that the tail cover is properly secured.
- Test the machine. Reconnect the handpiece and test it according to the manufacturer's instructions once the unit has been fully reassembled.
4. How to Tell Whether the Handpiece or Main Unit Is Faulty
Sometimes the handpiece is not the problem. The main nail drill machine may have a damaged socket, incompatible voltage, faulty controls, or a defective control board. Follow these checks to narrow down the cause.
Step 1: Check the main unit's functions
- Check whether the battery or power indicator displays normally.
- Check whether the forward and reverse controls respond correctly.
- Check whether the speed adjustment responds to changes in the setting.
- Inspect the handpiece socket for visible damage or a loose fit.
- Check for error indicators or unusual behaviour described in the manual.
Step 2: Check the rated voltage
Look at the voltage and specifications printed on the back of the nail drill machine. Some models use a 7.4V system, while others use a 12V system. These values are examples, not universal specifications for all nail drills.
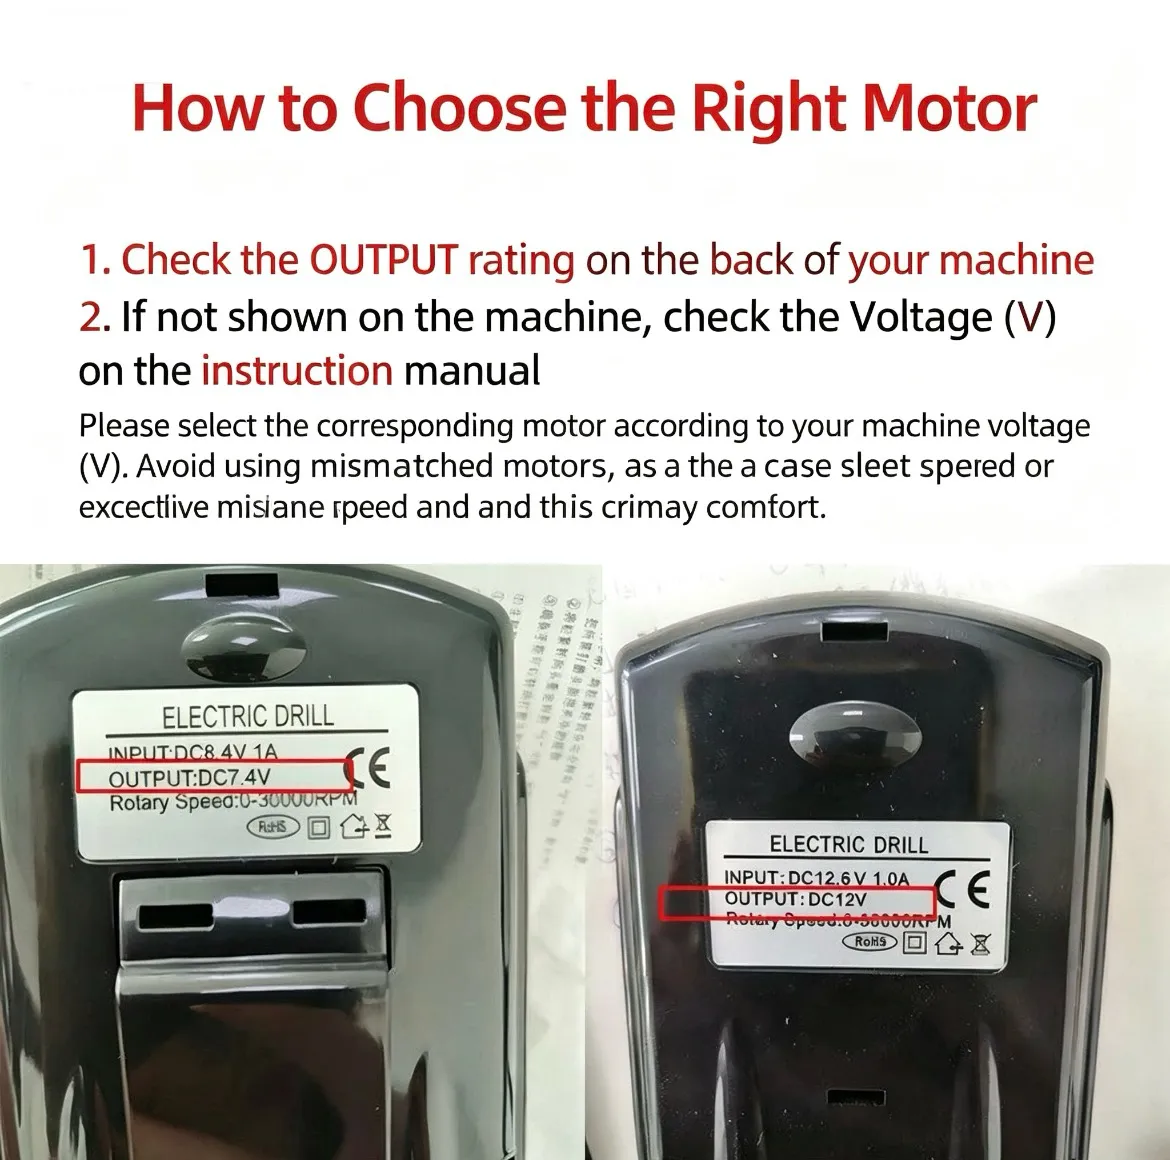
Reference image: Checking the voltage and specifications of a nail drill.
Always match the replacement handpiece, motor, power supply, and main unit to the manufacturer's specified voltage and electrical requirements.
- Using a component rated for a higher voltage than the machine supports may cause overheating or damage to the motor or control board.
- Using an incompatible lower-rated component may cause weak performance, stalling, excessive vibration, or other faults.
Voltage alone is not enough to confirm compatibility. Also check current rating, connector type, polarity, motor specifications, and the manufacturer's compatibility information.
Step 3: Check the handpiece connector size
Some nail drill machines use different handpiece connectors. Check whether the socket is the correct size and type for the replacement cable or handpiece. A connector that looks similar may still have a different pin arrangement or electrical specification.
Step 4: Decide which part needs repair
- If the cable is damaged: Replace it with a verified compatible cable.
- If the motor is faulty: Have the motor inspected and replaced if necessary.
- If the handpiece is damaged: Check whether repair or a compatible replacement handpiece is the appropriate solution.
- If the main unit is faulty: The machine may require professional repair or a compatible replacement unit.
If the fault remains unclear, avoid repeatedly switching the machine on and off. Contact the manufacturer or supplier with the model number, rated voltage, and a description or video of the problem.
How to Prevent Nail Drill Problems
- Keep the handpiece dry. Never immerse it in water or allow liquid to enter the motor.
- Protect it from drops. Impacts can damage bearings, the spindle, and internal components.
- Remove the nail drill bit when the handpiece is not in use. Follow the manufacturer's storage instructions.
- Do not lubricate bearings unless instructed. Oil or rust remover can attract dust or damage parts not designed for lubrication.
- Use compatible accessories. Check voltage, cable connectors, motor specifications, and handpiece compatibility before replacing parts.
- Clean and maintain the machine correctly. Follow the maintenance instructions supplied with your model.
Need Help with Your Nail Drill Machine?
A faulty electric nail drill does not always mean that the entire machine needs to be replaced. Correct troubleshooting can help identify whether the issue is related to the handpiece, motor, cable, or main unit.
At MacNail, we understand that equipment reliability and after-sales support matter to nail technicians, salons, wholesalers, and distributors. If you purchased a nail drill from us and experience a problem, contact our team with your product model, a description of the fault, and clear photos or a short video. We can help you determine the appropriate next step based on the product and its warranty conditions.
Need Nail Drill Troubleshooting or Wholesale Support?
Contact MacNail for product information, compatible accessories, wholesale enquiries, and after-sales assistance.
Contact MacNail on WhatsAppRecommended Professional Nail Drill
Looking for a professional e-file nail drill? Explore our nail drill machine for more product details.
Click the image to view the ND-014 nail drill product details.